In the initial release, custom attributes only apply to files. Later
releases will add support for folders, file versions, libraries, and
workspace-level attributes.
Who Can Use Custom Attributes
- Workspace admins
- Create, edit, reorder, duplicate, and delete custom attributes.
- Decide which attributes are filterable.
- Users with upload access
- Edit values for custom attributes on files.
- All users who can view files
- See filterable custom attributes in the Files view filters.
Attribute Primitives and Types
In general, custom attributes have:- Name — the label shown in the UI (must be unique).
- Primitive — the underlying data type.
- Type — how values are entered or constrained for that primitive.
- Text — Free-form text.
- Number — Numeric values.
- Boolean — True/false values.
- Date — Date.
- For Text and Number:
- Any value — Users can enter any value of the appropriate primitive.
- Select — Users pick a single option from a predefined list.
- Multi-Select — Users pick one or more options from a predefined list.
- For Boolean and Date:
- These do not have a separate Type setting; the value is always a single Boolean or Date.
- Must have a unique name within the workspace.
- Are visible on all supported objects (currently files only).
Attribute visibility controls (for example, hiding certain attributes from
specific views or users) are not available yet, but are planned for a future
release.
Managing Attributes
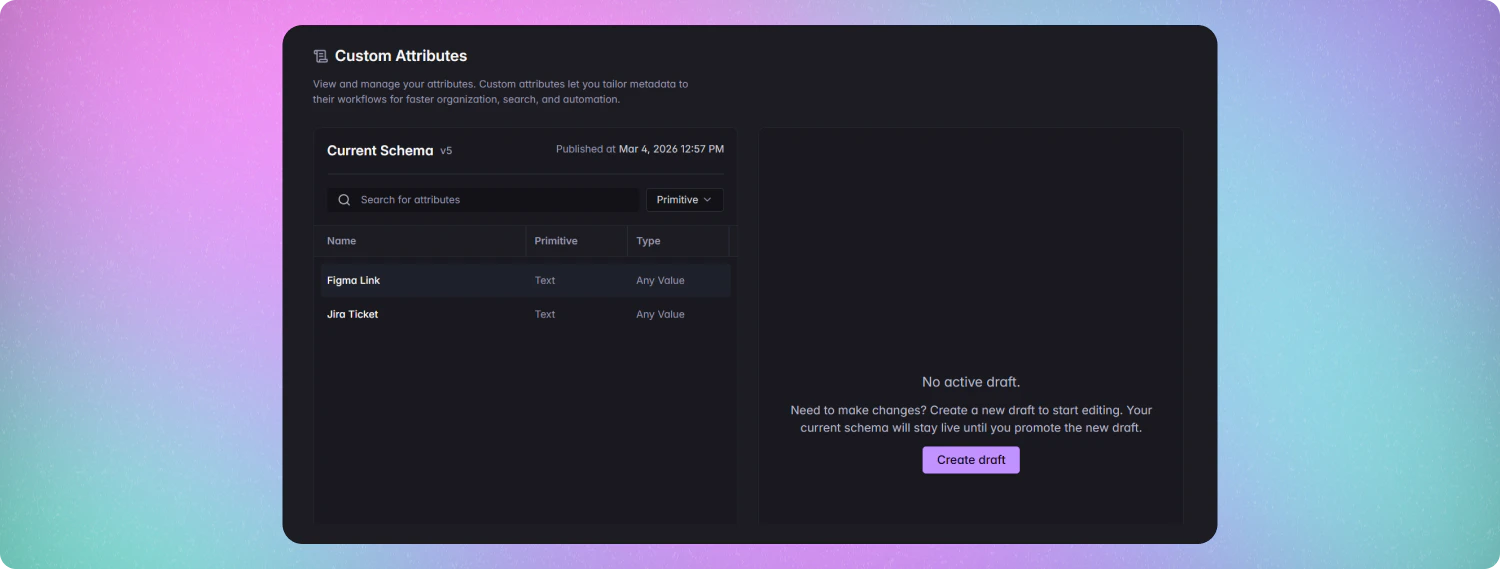
- Open the Mudstack desktop app.
- Go to Workspace Settings.
- Open the Custom attributes page.
Discriminators
Discriminators let you target specific sets of objects with different attribute configurations based on a query.- A discriminator defines which files a given attribute set applies to (for example, files in a certain path, with a certain extension, or matching other file metadata).
- If there is no discriminator, the attribute set applies to all files in the workspace.
- There is one shared draft per discriminator (or per object when there is no discriminator). All workspace admins editing that discriminator work on the same draft.
- The draft is saved to the cloud automatically as you make changes.
- There is only one draft per discriminator (or per object when there is no discriminator).
- Other workspace admins see the same draft and can collaborate on it.
- Changes in the draft do not affect files until you promote it.
For the first release of custom attributes, we will only support Files as one
discriminator.
Create a New Attribute
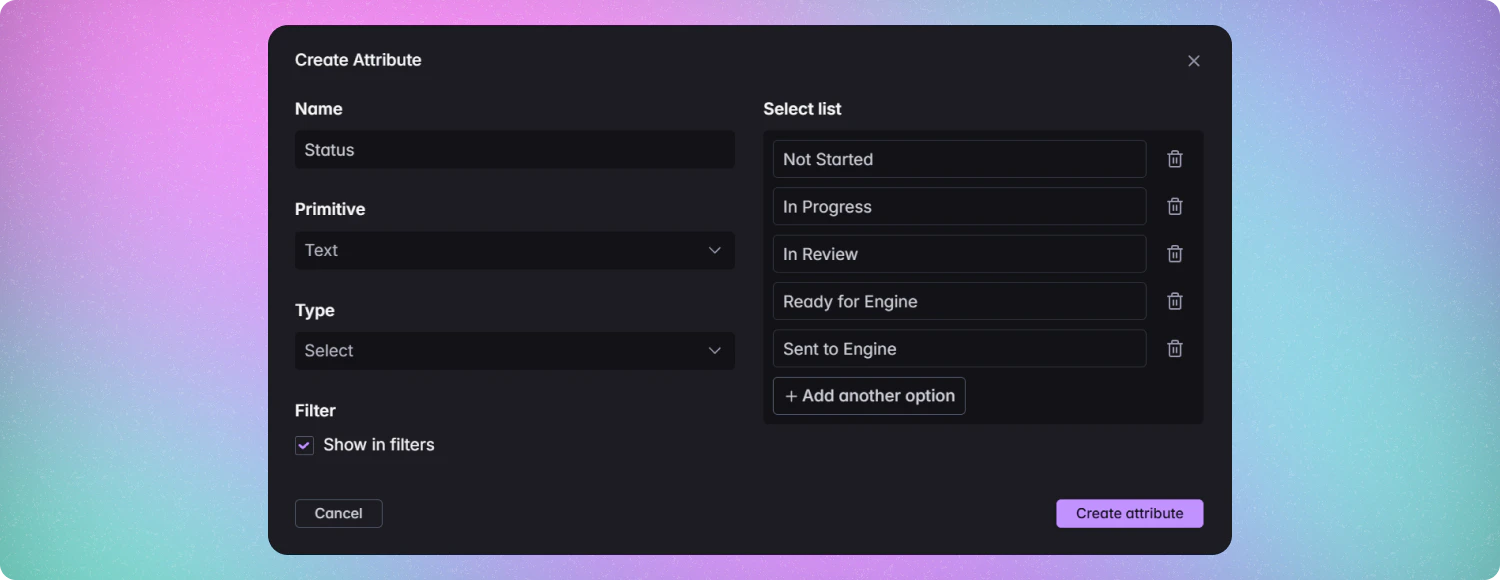
- Click Create a new attribute.
- A new row appears at the bottom of the attribute list.
- Set the Name (must be unique).
- Set the Primitive:
- Text
- Number
- Boolean
- Date
- Set the Type (for Text and Number primitives only):
- Any value
- Select
- Multi-Select
- For Boolean and Date, Type is fixed and not editable.
- (Optional) Click Options:
- For Select and Multi-Select, define the list of allowed options and any relevant validation (e.g. required, max selections).
- Set a default value (can be empty).
- Toggle Show in filters if you want this attribute to appear in the Files view filter list (see Filtering and Searching).
Adding many custom attributes to the filters list can slow down search and
filtering. Prefer only marking attributes as filterable when they are truly
needed for discovery.
Required Dropdown Values
For Select and Multi-Select attributes:- Attributes that are configured as active/required must have a valid value before you can save changes.
- If a dropdown-type attribute is missing a required value:
- The attribute row shows a warning indicating it’s incomplete.
- You must resolve the warning (set a valid value) before the change can be pushed.
Edit an Existing Attribute
Within the draft, you can update:- Name
- Type (within the same primitive, where applicable for Text/Number)
- Options (for Select / Multi-Select)
- Default value
- Filterable / Show in filters toggle
- Order in the list
- You cannot change the Primitive of an attribute after it has been created and promoted.
- If you need a different primitive (for example, changing Text to Number), create a new attribute and migrate values as needed.
- Locate the attribute in the list.
- Use the edit button to update:
- Name of the attribute.
- If the attribute is filterable.
- Drag the attribute to change its order. This order controls how attributes appear on files and in filter lists.
Delete an Attribute
- Find the attribute in the draft list.
- Click the Delete button on that row.
- Confirm deletion when prompted.
- Existing values on files are preserved on the record until the next write to that file, but the attribute will no longer be editable.
- The attribute is removed from the workspace configuration and will no longer appear in the UI or filters.
Reordering Attributes
You can drag attributes in the draft list to change their order.- The order on the Custom attributes page controls:
- The order attributes appear on files.
- The order filterable custom attributes appear in filter lists.
Promoting Attribute Changes
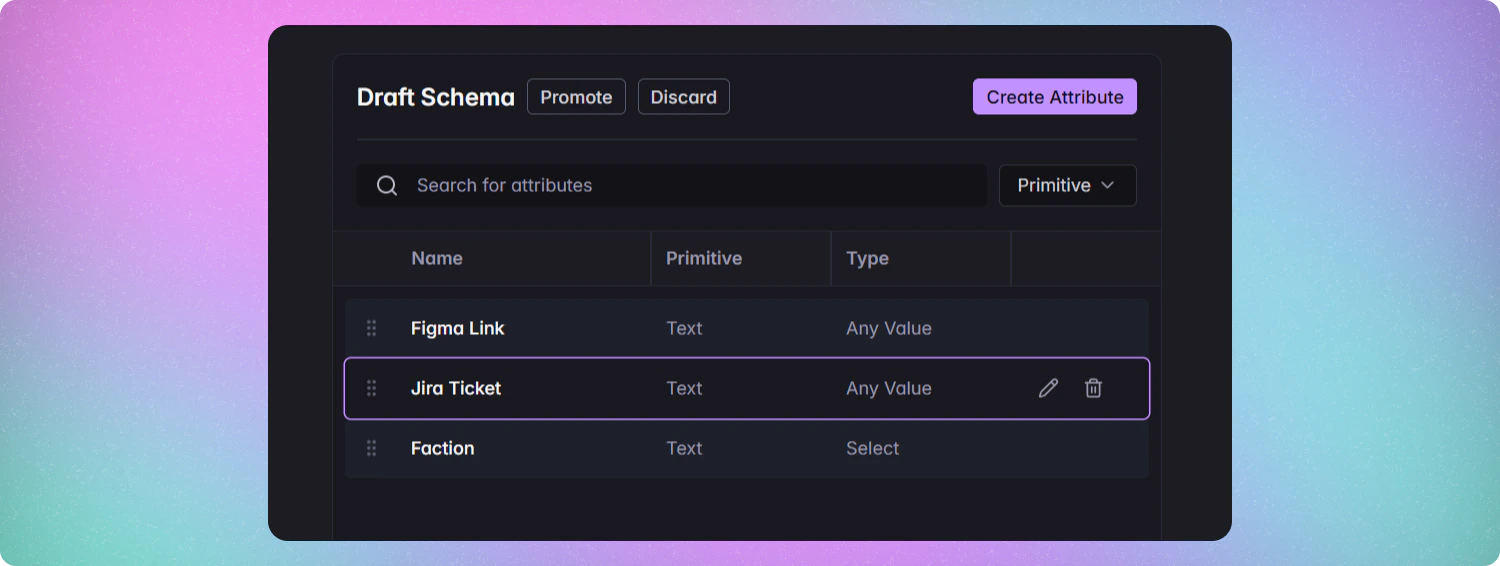
- Click Promote (or the equivalent promote action) on the Custom attributes page.
- Mudstack validates the entire draft:
- Attribute names are unique.
- Attribute definitions are compatible with existing data as required.
- Filter and option configurations are consistent.
- If validation fails, you’ll see errors to correct in the draft before you can promote again.
- If validation succeeds, the draft becomes the new promoted configuration for that discriminator.
Changing attribute definitions (including create, edit, delete, reorder)
does not generate local file value changes or commits by itself. Only
editing attribute values on specific files produces local changes.
Attribute Values on Files
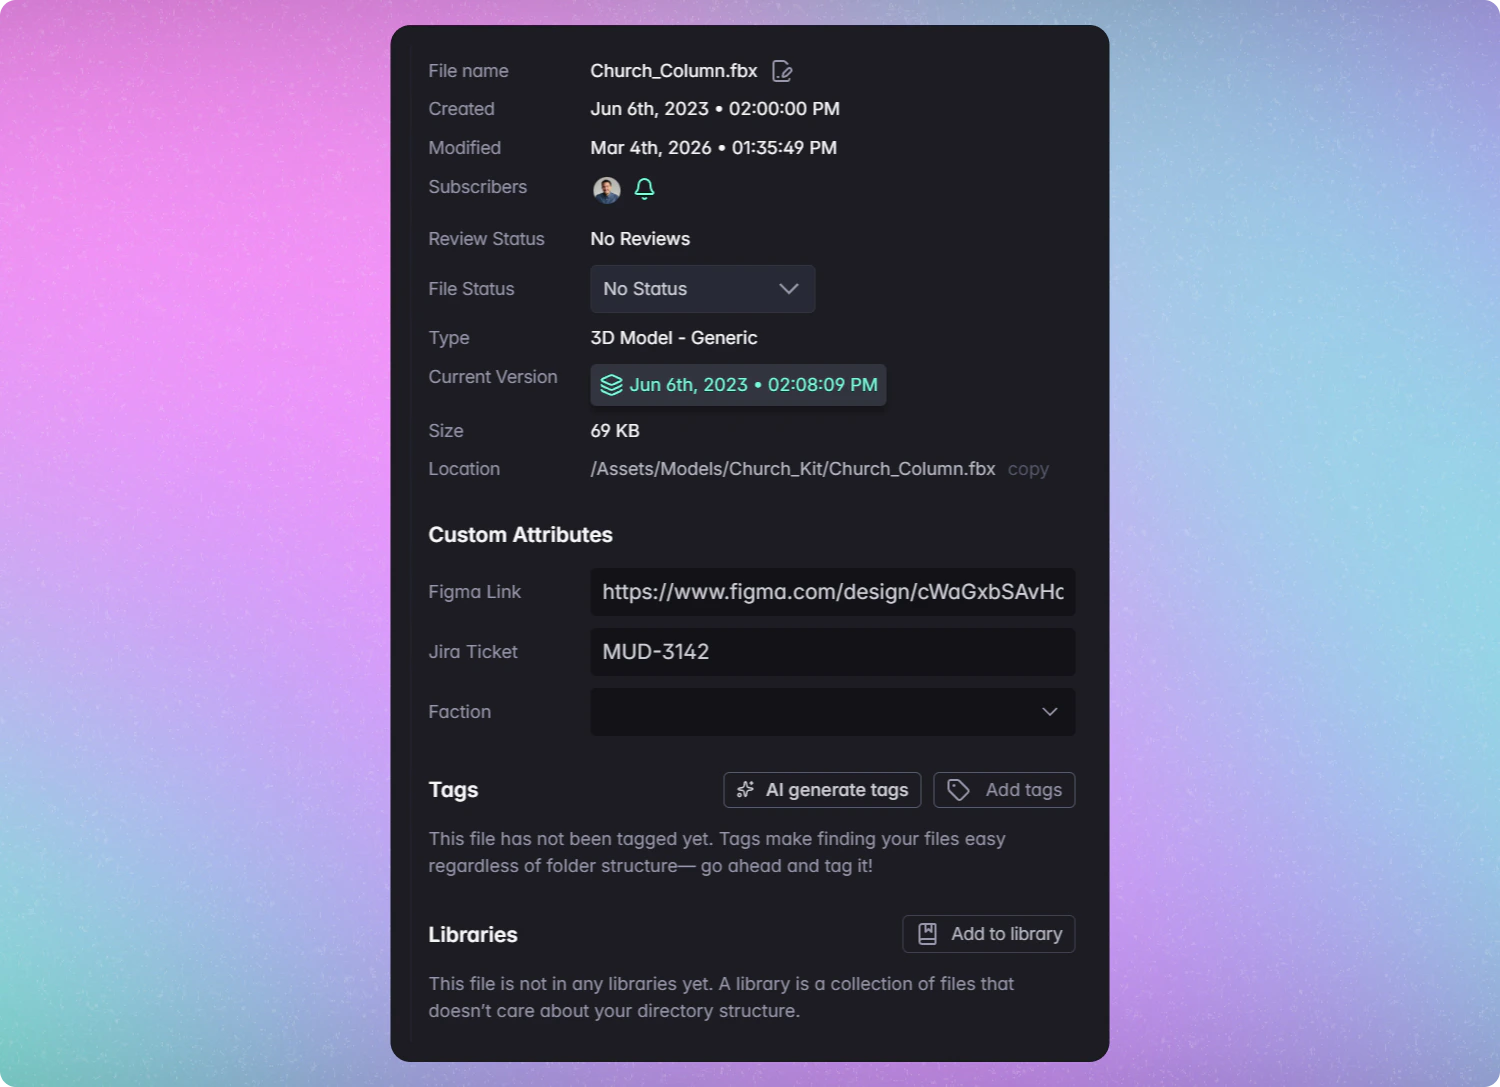
Editing Values
With upload access, you can edit values for any custom attribute defined in the workspace:- Open a file.
- Go to the Info tab.
- Scroll to Custom attributes.
- Update the value for the attribute you want to change.
- All supported primitives and types are editable:
- Text (Any value, Select, Multi-Select).
- Number (Any value, Select, Multi-Select).
- Boolean.
- Date.
- Attributes appear in the order defined on the Custom attributes page.
- Changes to attribute values are treated like other local changes:
- They appear in the Changes View.
- Pushing the change creates a web-based commit, just like edits to built-in attributes.
When Values Are Updated
- Local edits to attribute values become part of your workspace’s history once pushed.
- Users see updated attribute values as soon as:
- The commit containing the changes is synced, and
- They fetch or refresh data for those files.
Filtering and Searching by Custom Attributes
Filterable custom attributes can help your artists find files based on your own custom criteria.Making Attributes Filterable
- Each attribute has a Filterable option that can be toggled on the Custom attributes page.
- Only attributes marked as filterable appear in the filters panel in the files view
Each additional filterable custom attribute adds overhead to search and
filtering. For the best performance, limit filterability to attributes that
are actually used for discovery.
Using Custom Attributes as Filters
To filter by a custom attribute:- Open Files.
- Open the Filter panel.
- In the filter list, you’ll see:
- Built-in (base) attributes.
- Any custom attributes marked as filterable.
- Click a filterable custom attribute to see its available facets (values).
- Click a facet to filter files by that attribute value.
API Behavior for Custom Attributes
Custom attributes are available through the API both at the definition level and on individual objects. See the API documentation for more informationAttribute Definitions in API Responses
When you request an object that uses custom attributes, the response includes information about the attributes that exist in the workspace. For each attribute definition, the API includes at minimum:- title - Attribute Name
- type - Primitive
- enum - (if the type supports options, such as Select or Multi-Select)
- displayorder - Order of an attibute on an object
Attribute Values on Objects
For each file with custom attributes, the object’s representation includes at minimum:- Attribute name
- Primitive and Type
- Value
Note: Attribute and value CRUD endpoints are exposed via the API. External tools and plugins can create/update attributes and attribute values, and those changes will be reflected in the app once fetched.
How plugins work with custom attributes
Plugins can:- Read workspace custom attribute definitions and values.
- Create or update custom attribute values.
- Create or update attribute definitions via the API (where permitted).
- Automatically populating a custom attribute from an external system (e.g. Jira ticket IDs, contract IDs).
- Keeping a large dropdown list in sync with external data (e.g. IP or contract lookup tables maintained outside Mudstack).
- Interrogating a file on new version and updating custom attributes (e.g. Poly count, material count, image dimensions)